
DIY Advent Calendar

A treat a day to make the season merry & bright! Use your creative skills for this cute craft for the holiday season.
Tools
Push pins
Mini craft bags
Washi tape
Christmas ribbon
Clothes pins
Markers, stamps or stickers
Double sided tape
Directions:
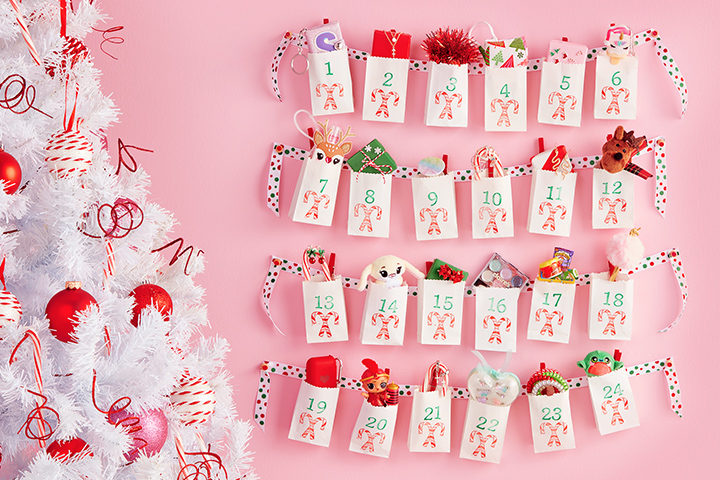
1. Decide what kind of bags you’d like to use. We used super cute paper bags that were the perfect size and color for the look we wanted. You could even use evelopes with a 1/3 of one side cut to make a pocket.
2. Use markers, colorful pens to write numbers on each bag. Feel free to add any additional flair like Christmas stickers or color on some candy canes like we did here. Another idea would be to purchase some number stickers like these that you could apply to each bag.
3. Lay out how you'd like your calendar to hang. Get creative with washi tape, twine or even garland for your bags to hang. We opted for 4 rows of 6 bags, leaving around 2.5 inches in between each bag and around the same between each row.
4. Use clothes pins, double sided tape or holiday ribbon to attach your bags to the hanging strip where you want them to hang from. You can leave the end tail of the strip hanging past the row, and pin/tape however you'd like with push pins to make it easy to remove. Utilize the double sided tape to reinforce your row to keep it secure.
5. Last but not least...fill the bags with fun treats or mini gifts from Claire's! Try blind bags, keychains, lip gloss, nail polish plus other fun ideas you might have.
SOCIAL ACTIVITY
Come hang with us on social and share your content using #BeTheMost
